Saturday, February 9, 2013

Pinterest Loves Button Trees (and so do I)

Hey everybody,

my first button tree
Hope you all had a great week. So, one of the very first crafts I pinned when I signed up for Pinterest was this super adorable little painting of a tree with buttons for the leafs. The more I perused Pinterest, the more versions of the button tree I found. I wanted to make one so badly so I called my friend Beka up and asked her if she wanted to have a Pinterest party and make a version of this. Of course she said yes, I mean come on, so cute. I ran out to the store to get our supplies and headed over to B's house. My first button tree turned out pretty fabulous, B's.... not so much haha. But I won't get in to that. She ended up fixing it a few days later and hers too turned out to be fabulous as well.

The thing I like about these trees is that they all turn out a little bit different depending on the artist. I don't know why. It's something with the way each crafter makes the swirls for the leaves, kind of like a signature if that makes sense. They're ridiculously easy to make and look great. I made my original to match my living room, made one for my mother-in-laws new kitchen and a third one for my 2-year-old niece L. I'm going to show you how I made L's because, IMO, it turned out the best.

what i used
Here we go, so first off you will need a canvas of any size. It really is your preference. Next, select a base color that will match the room you will be hanging your button tree in. For my first two trees I used 1 solid color. For L's, I decided to get a little crazy and make the background striped in 4 different colors that match her bedroom. You'll then need to get you a black paint pen with a thick point. A bottle of clear glue and some buttons of different sizes. You can get ALL of this stuff at Wal-mart! The canvas, the glue, the paint and GET THIS!! Wal-mart sells bags of buttons like you see in the picture in a pretty big assortment of colors. They also have smaller packs in an even bigger selection of colors. And the prices are about $2 to $4 dollars cheaper than at Michael's, which only sells the big bags of buttons.
tape off canvas
this is what it looks like once it dries
Ok, so for L's button tree I used pink, red, green and blue paint. I took medical tape and taped off the canvas the way I wanted it. As in the tape you'd use to tape up a broken finger. It's a smaller stripe and that's what I wanted to break up the four colors. Breaking the stripes up with a smaller white stripe also made it so I didn't have to wait for any of the paint to dry before re-taping the canvas off to paint a different color stripe. Ya still with me??


sketch your tree with pencil first
 Next I put the painting aside for about 20-30 minutes to dry completely. Once it was dry I took a pencil and drew my tree. What I like to do it draw the trunk of the tree first and then I add the branches. I draw it out very thin and then trace it with a black paint pen. I then go over it with a thin brush and black paint to make the branches and trunk thicker. (please excuse the sideways pictures!! Blogger is being a jerk right now and is uploading some of them the wrong way. I've been trying to fix it for an hour but it's a glitch. UGH!)


trace the pencil with black paint pen


once it's traced with paint pen I fill it in with black paint and brush


this is what it looks like when dry


glue buttons on
 Once the tree is dry you just take all you're different sized buttons and glue them on wherever you want! That's the fun part! *TIP* Make sure you let the painting dry over night laying flat. Otherwise the buttons will slide down and leave a big glue skid mark and your button will be in some weird place.   


finished product (sorry blogger is sucking and uploaded it sideways)
 So, is this project worth the cash? ummmm, Duh. I've made like 3 so of course that's a yes. And they're fun to make.
Total cost: Canvas from Michaels $2.00 (again I buy these in a 5 pack with a coupon so they're super cheap) paint-this depends, If you do a solid background then it's $0.50 a bottle at Wal-mart. for my painting it was $2.50, paint pen- $2-3 bucks at Wal-mart again. And buttons Wal-mart $3.00 to $5.00 depending on the bag size. Because I paint a lot this project cost me about $4.00.


another tree I've made

You're welcome!
The Posh Pinner

Sunday, February 3, 2013

Biotin for hair and nails!! Really works!

Hey everybody,

I just started a new job this week and haven't had time to finish my latest blog post but I wanted to at least come on here and let you all know about a tip I got off of Pinterest.

I constantly scroll through the beauty and health category looking for new products.  When I came across a post saying Biotin was a miracle supplement that helps hair and nails grow I was like "jigga what?!?! Got to try that! My hair never seems to get much further than right past my shoulders and I have very brittle nails. A hormonal imbalance has led to a lot of hair loss for me as well so I was willing to try anything.

I got a small bottle of 1,000 mcg Biotin from Walmart for like $5 bucks and started taking it a couple of times a week back in November after my latest hair appointment. I'm not religious about taking it but I try to remember  to take a pill 2-3 times a week.

I thought my hair was getting ridiculously long but it was reaffirmed yesterday when I went to my hair gal and she told me it had grown at least 3 inches since my last time in. I'm serious. This stuff worked like a boss for me. I don't know if its because I didn't take any supplements what so ever so it shocked my body or if my hair just went through some sort of a phase, but I tend to believe it's the biotin since my hair has never grown like this before. My girl cut about 2 inches off and I can't even tell.

So anyway, yeah ummmm. If you've seen the biotin pin and were thinking about trying it out.... Do it.... Like Now! It's awesome! I will now be taking it daily.


Wednesday, January 23, 2013

More REC-UH-PEEEES!! (in my best Oprah voice)

Alright, Alright, Alright! You asked... and I listened.  I do believe I have received about 100 emails asking me to write another post about my adventures (or mis-adventures) in the kitchen trying out these Pinterest recipes that you all are repinning. Lucky for you guys in my brief hiatus away from being the Posh Pinner I still had to cook dinner for my husband, so I have lots and lots of recipes to tell you about. Now I'm just going on mine and my husband's opinion on the dishes, so if I say I hate something but you LOVED it than cool. Feel free to leave me a comment (remember your manners) telling me otherwise.

The Good

1)World's Best Mac & Cheese-Beecher's Recipe
I found this one on Pinterest a few days ago and I have to tell you, this is absolutely the most delicious mac & cheese I have ever had in my entire life and I'm pretty darn picky when it comes to my mac & cheese. You may recognize the name Beecher's. It was featured on Top Chef Seattle and Beecher's cheese curds are world famous. I think the week after the episode aired, my husband and I booked it to Pike's Place Market to try the curds. Instead I paid about $8 bucks for this mac & cheese and OH MY YUM. Here's the recipe- I highly recommend splurging and ordering the Beecher's cheese online. This would be a great dish to take to someones house for a dinner party. It's fan-frickin-tastic but kind of a pain in the butt to make. So allow yourself some time when making this one.
Step 1-IngredientsButter or vegetable oil, for baking dish
6 ounces penne
2 cups Beecher's Flagship Cheese Sauce
1 ounce cheddar cheese, grated (1/4 cup)
1 ounce Gruyere cheese, grated (1/4 cup)
1/4 to 1/2 teaspoon chipotle chili powder
DirectionsPreheat oven to 350 degrees. Butter or oil and 8-inch baking dish; set aside.
Bring a large pot of water to a boil over high heat. Cook penne, according to package direction, for 2 minutes less than recommended on the package. Rinse pasta in cold water; set aside.
In a medium bowl, mix together cooked pasta and sauce gently but thoroughly. Pour pasta into prepared baking dish; sprinkle with cheeses and chili powder. Bake, uncovered, for 20 minutes. Let stand  5 minutes before serving
Step 2- Cheese Sauce Ingredients4 tablespoons (1/2 stick) unsalted butter
1/3 cup all-purpose flour
3 cups milk
14 ounces cheddar cheese, preferably Flagship, grated (about 3 1/2 cups)
2 ounces Jack cheese, preferably Just Jack, grated (about 1/2 cup)
1/2 teaspoon coarse salt
1/4 to 1/2 teaspoon chipotle chili powder
1/8 teaspoon garlic powder
DirectionsMelt butter in a heavy-bottomed saucepan over medium heat; whisk in flour. Continue whisking and cooking for 2 minutes. Slowly add milk, whisking constantly. Cook, stirring frequently, until sauce has thickened, about 10 minutes. Remove from heat. Add cheeses, salt, chili powder, and garlic powder. Stir until cheese has melted and all ingredients are well incorporated, about 3 minutes.
Use immediately or refrigerate up to 3 days. To reheat sauce, place in a saucepan over low heat, stirring frequently, until heated through.
2.)Crockpot Pineapple Chicken
 First off, this is a simple little recipe I found floating around Pinterest from the undressedskeleton.tumblr.com. It's super healthy, this girl has nothing but good for you dishes on her blog.  You can throw it in the crockpot and let it cook all day. I'm not saying this is the best thing I've ever made in my crockpot. It's decent and it's easy. It's fine for a random Wednesday when you're out of ideas and don't feel like cooking, or you're on a diet.
Ingredients
1 cup pineapple juice 1/2 cup packed brown sugar 1/3 cup light soy sauce 2 pounds
chicken breast tenderloins.
Directions
Cook on low 6-8 hrs and they should just fall apart

3.)Banana Nutella Toast from closetcooking.com
Look at that picture and tell me that doesn't make your mouth water. What's not to love about this. Nutella. Banana. Toast. Enough Said!!
Ingredients1 tablespoon butter
1 tablespoon brown sugar
1 banana (peeled and sliced)
1 or 2 slices of bread
2 tablespoons Nutella (chocolate hazelnut spread)
DirectionsMelt the butter and sugar in a pan. Add the bananas and cook until golden brown and caramelized on both  sides, about 3-5 minutes per side. When the bananas are done, pop your bread in the toaster. When it's nice and toasted, coat with Nutella and then spoon the bananas on top. Boom!


4.)Olive Garden Salad Dressing
Who doesn't LOVE Olive Garden's Salad dressing? No, seriously. Who? Cause I've never met anyone who doesn't. Now, I have not made this dressing and I will explain why at the end of this recipe. But if you decide to try the Pinterest version here ya go.

Ingredients1 packet Good Seasonings Italian Dressing
(Ingredients needed to make dressing from the packet; oil, water, vinegar)
½ tsp. dried Italian Seasoning
½ tsp. table salt
¼ tsp. black pepper
½ tsp. sugar
¼ tsp. garlic powder
½ tbsp. mayonnaise (no Miracle Whip, please)
¼ cup olive oil
2 tbs. white vinegar
1 ½ tbsp. water
Directions
Make the Good Seasonings Italian Dressing following the steps on the back of the packet. You have to follow this direction to a T or it doesn't come out right. Then add the remaining ingredients and whisk. Pop it in the fridge and you're ready to go. Part of what makes the taste of the Olive Garden salad is the onions, tomatos, olives and Parmesan cheese so make sure you have all that in your salad.

The reason I don't make this version is because it's a LOT of spices and a LOT of measuring. BOO! No fun. Now are you ready for your mind to be blown?? Go to Wal-mart (your Kroger or Safeway may have it as well. Mine doesn't). Hit the salad dressing aisle. Look for the dressing packets. You'll see like 40 Hidden Valley Ranch packs and then the Good Seasonings packets. There is the Italian pack in red and then there is one called Garden Herb in purple. But the Garden Herb and follow the steps on back exactly. It's a pretty darn close match to Olive Garden's in 2 easy steps, and all you'll need is oil and vinegar. *Another tip*  You could make this in a jar, a small bowl, or a clean, empty salad dressing bottle.... But, if you look right around that area near the dressing packets Good Seasonings sells their own salad dressing container in a little box. It includes the Italian dressing packet (which is pretty good) and has a cap. It shows you the lines to pour the vinegar and oil up to. It's nice to have around and is pretty fancy looking. :) You just add the ingredients and shake it up. I make this dressing every other day. It's amazing and I can't tell a difference between the OG and the one I make. Your choice, but choose my version.


The Bad

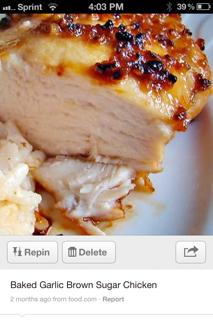
1).Baked Garlic Brown Sugar Chicken  from cook.com
This one could be better. It's Just way too much of everything. Too much garlic, too much brown sugar. It needs some serious adjusting to the measurements. Adjusting that I just lack the talent and pallet to figure out. If you love sweet garlic go for it.
Ingredients
 boneless skinless chicken breasts
4 garlic cloves, minced
4 tablespoons brown sugar
3 teaspoons olive oil
DirectionsPreheat oven to 500°F and lightly grease a casserole dish. In small sauté pan, sauté garlic with the oil until tender. Remove from heat and stir in brown sugar.Place chicken breasts in a prepared baking dish and cover with the garlic and brown sugar mixture. Add salt and pepper to taste. Bake uncovered for 15-30 minutes.
2. Spicy Honey Chicken Just so you guys know, I don't like to post the names of the blogs or websites that originally post the recipes that I deem Yucky. This is definitely one of them. It's waaaaay too time consuming. It's waaaaay too complicated and it's waaaaaaaay messy. That and it's not that tasty.
Ingredients
8 boneless skinless chicken thighs, about 2lbs (you could use breasts as well but thighs stay more moist)
2 teaspoons vegetable oil
Rub:
2 teaspoons granulated garlic (you can sub 1 teaspoon garlic powder here)
2 teaspoons chili powder
1/2 teaspoon onion powder
1/2 teaspoon coriander
1 teaspoon kosher salt
1 teaspoon cumin
1/2 teaspoon chipotle chili powder
Glaze:
1/2 cup Honey
1 Tablespoon Cider Vinegar
Directions
Combine the rub spices in bowl and mix well. Use kitchen shears to trim off any excess fat from the chicken pieces. Pat dry. Drizzle oil over chicken and rub in with your hands to lightly coat all the pieces. Then toss chicken with the spice rub to coat all sides well. Use your hands and get in there! Grill chicken for 3-5 minutes on each side, until cooked through. While chicken is cooking, warm honey in the microwave so it's not so thick. Add the vinegar and combine well. Reserve 2 Tablespoons of the honey glaze for later after the chicken has cooked to pour on right before serving. Take the rest and brush on chicken (both sides) in the final moments of grilling. Can also be made on an inside broiler.


XOXOXOXO

The Posh Pinner

Wednesday, January 16, 2013

I'm Baaaaa-aaack!!

Hello all my faithful readers!

I must apologize for my absence and update you on where I've been and when I'll be posting a new project. I've received several emails wondering "Are you still the Posh Pinner?? YES my lovies! and I'll be posting soon!!

I honestly did not realize people actually read this blog, so I was quite surprised to check my email and see that I had messages from readers that aren't just by Facebook and Pinterest buddies who like to see me go off on a tangent about something stupid. So again, I apologize for not getting back to you guys. I must have looked like a real B and that's so not me! Things got pretty crazy for me around the holidays. We had house guests that wouldn't leave, I have some health problems and spent a lot of time at the doctor, and I got the bright idea to apply to grad school. And of course the schools I applied to require recent GRE scores. My applications are due in 1 week and since I graduated from college like 10 years ago I had to study 15 hours a day to cram for that dang test. I mean really.. who actually remembers how to find the missing degree of an isosceles triangle? OKAY! Ain't nobody got time for that! But, I am happy to report that I nailed the GRE and think my scores are good enough to get me in to the schools I applied to. My applications are signed, sealed and depending on UPS, delivered.
With that huge stress in my life OVER, I can now get back to what's really important. Wasting my time and money on Pinterest projects. :)

I do feel that I need to remind everyone about the purpose of my blog.  I am not an artist. I am not a master crafter. I can't sew, I can't whip up a three course meal from scratch. I am just a chick who likes to look at Pinterest and say "hey, that looks easy enough. I'm going to see if I can do that." I've never said I'm Betty freaking Crocker. I've never claimed to be the Martha Stewart of Pinterest. I simply get caught up in the latest Pinterest craze and blog about how MY projects turn out--the good and the bad.  I started this blog as a form of entertainment for my friends and to save people, who like myself suck at crafting, from wasting hours of their life on crap. I have received two or three rather mean emails telling me "I SUCK" for not doing this project a certain way. Or," OH MY GOD, I can't believe you didn't know to do this on that project, what are you stupid? Everyone knows that." Weeeeeellllll, I'm soooooooo sorry my crafting is not up to your standards. Again, NOT AN EXPERIENCED CRAFTER! And neither are 99% of the people who read my blog. If I were super craft-tastic I wouldn't be trying out other people's pins, would I?? No, I'd be creating my own.

This blog is simply entertainment. I'm not going to buy a drill or hand sander or table saw to complete ridiculously complex projects. I'm not going to build a dining room table out of old window panes I picked up at an estate sale. I choose easy projects that can be finished in an hour or two on a random Saturday by someone who doesn't have a clue about what the hell Mod Podge is. I throw ingredients into my crock pot and tell you if it's vomit in a bowl or worth feeding to your family. I cut up my husband's old, crusty sock and roll my hair around it to teach you how to create the perfect bun. Entertainment People. I do this for fun. I don't get paid for running this blog.

To all of you super supportive readers who leave awesome comments with suggestions or words of encouragement or comments telling me about how your projects turned out. I appreciate it more than you know. It's always nice to know someone took the time to read my stuff, because I do spend many, many hours and my own money trying out projects that my readers ask me to.

Now that that's all cleared up, hopefully the few people who feel the need to be douche nuggets in anonymous emails will go troll somewhere else.

And thank you again to everyone who reads on a regular basis, and to the hundreds who have written me sweet emails telling me they love my blog. I will have a new project up later this week and plenty of new recipes.

XOXOXOXO
The Posh Pinner

Thursday, October 11, 2012

Pumpkin Project #3- The Pumpkin Spice Latte

And wrapping up our pumpkin theme for this week.. Drum Roll Please dadadadadadadadadadadadadadadadada   The Pinterest Pumpkin Spice Latte!!!


How many of you have this one pinned?? I'm dying to know.. I'm gonna make a jump and say at least 90% of you who are on Pinterest had at some point planned on trying this one.. And at $4.50 a pop at Starbucks who the hell can blame you! I've seen about 5 different pins claiming to have made the exact replica of the Starbucks Pumpkin Spice Latte. Every single one of them is the same damn recipe so I thought, "hmm, these itches must be on to something." 

Here's what it calls for:
2 cups of milk
2 tbsp canned pumpkin
2tbsp sugar
2tsp vanilla extract
1/2 tsp pumpkin pie spice
1/2 cup of strong coffee or 1/4 cup of espresso if you have a machine.
whipped cream


First brew your coffee. Then You're supposed to cook the milk, pumpkin and sugar in a saucepan on medium heat until steaming then remove from heat and stir in the vanilla and pumpkin pie spice. Next transfer that to a blender and process for 15 seconds until foamy (or whisk it till it's bubbly). Pour the mix into your coffee and top with whipped cream and sprinkle a tiny bit of pumpkin pie spice on top.

OK people listen up cause I'm only going to say this once.. DELETE! DELETE!! DELETE this pin now!! This pumpkin spice latte is NO WHERE close to the one from Starbucks!! It's disgusting and the pumpkin clumps up in it and you get a mouth full of slimy, hot pumpkin goo.. It is not good. I spit it out all over my counter. I seriously just threw up in my mouth a little bit just thinking about how bad this thing is! It's too natural tasting for me. That's the only way to describe it. I don't want my latte tasting like i just licked the inside of a pumpkin and that's what this was like. I suppose if you're one of my uber healthy vegan friends you may like this because it's made from real pumpkins, but if you don't give a shiz about any of that-- like me--you'll hate it.

Again, say it with me, Rayna hates to lose.. so I refused to not come out of my effing kitchen with something that half-way resembled the PSL from Starbucks. For about 2 hours I altered the recipe over and over again trying to get something drinkable and Finally.. FINALLY I think I got something a bit similar. ( I may have just burned off all my taste buds on hot coffee so don't get too mad if you don't think this is anywhere close.)

I mixed 2 cups of milk with 1 tbsp of vanilla, 1 1/2 tbsp of sugar (use 2 if you like your lattes sweet, in my opinion the PSL at Starbucks is a bit too sweet and strong) and 1/2 tsp of pumpkin pie spice and then heated it up on the stove until it was hot to the touch.. I used the Starbucks espresso coffee and filled my mug about half-way. Once the milk mix was pretty warm I whisked it until it was frothy (because pulling out the blender everyday ain't gonna happen!!) Then I poured it in to the coffee, added whipped cream and sprinkled the slightest bit of the pumpkin pie spice on top. I completely omitted the actual pumpkin because every time I used it the taste was still funky. I made Matt my guinea pig and he thought it was similar. He said he'd definitely drink it over spending the cash  at Starbucks every day.

So, there it is. My version of the PSL. It's still not going to be as good because Starbucks uses a thick sauce rather than a syrup or just a spice. If you love your PSL that much but hate the price you may want to just go to eBay and buy the actual Starbucks sauce for like $30 bucks and make them at home. That's what I did when they ran out of the Caramel Brule sauce last Christmas. Turned out pretty good with my cheapo little Mr. Coffee Cappuccino machine. ;)

Until next time, Happy Pinning!

XOXOXOXOXO
The Posh Pinner


Monday, October 8, 2012

Pumpkin Project #2-The Happy Fall Y'all Sign

Happy Blog Day!! Everybody ready for Pumpkin Project #2? The Happy Fall Y'all sign!


I love, love, love this one and think it's pretty easy to paint even if you are artistically challenged. This one is going to be kind of difficult to explain but I really want you guys to know how easy it is to make and cheap (much cheaper than buying one on Etsy or Ebay). I'll try to give you a play by play on how I replicated this and some helpful tips if you're not so hot at the artsy fartsy stuff.

First off, Michael's has AWESOME sales on their canvases about once a month. For one canvas at regular price, you can expect to pay up to $8.00 FOR ONE! Again, if you read my blog regularly you know I'm a huge cheap ass and refuse to pay full price for anything. That's why I always buy my canvases in bulk and on sale, whether it's at a craft store or at Wal-mart or online.  *Tip*-sign up for Michaels reward program. They'll give you a little card and you'll get emails with coupons and ads ALL the time. Usually I get a $40% off one item coupon every single week. They automatically take it off the most expensive item in your cart. When you sign up for the card you also get a 20% off your next purchase!! JIGGA WHAT?? Anyway,  I waited until they put their canvases on sale and bought a 5 pack for $11.99.. That's CRAZY good!! They also have decent prices for acrylic paint. (Wal-Mart is a tad bit cheaper) For this project I used four colors (green, brown, purple and orange) and bought a black paint pen for the writing. Trust me.. YOU WANT to do writing in paint pens if you aren't artistic.

So, to recreate this Pinterst painting all I did was draw out the shape of the pumpkins in pencil and then paint the background green. Next, I  painted the shape of the pumpkins orange (looks like a big orange blob which is fine because you'll outline the two pumpkins in black later) and let it all dry. If you can't freehand the pumpkins here's a little tip. I know you all have about 40 Tupperware bowls in various sizes in your bottom kitchen cabinet. Take the lids to a large one and medium size one and just trace them on to your canvas. Then paint them.


Next, I added the polka dots to the canvas background. I didn't like the green on green so I used purple instead. Completely up to you. *Tip* You know those  paint brushes that are just a rectangle sponge on a stick? Well, in the craft section they make those in the shape of a circle AND in small, medium, large! Is your mind blown yet?? It's Perfect for getting a Perfect circle and the paint goes on much easier!!You'll use these all the time if you start getting into painting. You just dab the circle in the paint and then stamp the circle on to the canvas and you've got your polka dot.

After the polka dots dried I wrote Happy Fall Y'all in a way that resembled the text the original artist painted. If you can't mimic this simply write it out  and add little dots to the end of the letters. (like how I did The Lettermans) It's just as cute. I painted the stems of the pumpkins, added a couple of lines down their base and added my last name.. As a bonus I took some of that baskety stuff from the Dollar Tree and glued it at the stem of the pumpkin.  Boom Goes the Dynamite!! Love it!!


And, since I had those four extra canvases I decided to make one for Halloween as well. I saw something on etsy where a crafter turned the o's in BOO into pumpkins and loved it so here's what I came up with. Check it out.


All I did for this one is paint my canvas black, free handed two pumpkins (again you can use bowls) and for the B I really just drew squiggly lines and filled it in with orange paint. Took the black paint pen and detailed the pumpkins and painted a green stem. Now, I will say the spider web was a bit more tricky. I started with a dot in the center of the B and then drew the straight lines through the dot until it looked like an asterisk. After that I simply drew upside down arches connecting the lines. Hope that made sense.


These paintings can be used year after year and I plan on making a few for Christmas. They also look great hanging on your front door instead of a wreath. You can make them, personalize them and then give them as gifts as well.

Coming up later this week, as promised, I'll tell you how the Pinterest Pumpkin Spice Latte turned out and give you a few tips for making it more Starbuck like cause Believe me, it needs some serious help!!! ;)

See ya in a few days!

XOXOXOXOXO

The Posh Pinner

Thursday, October 4, 2012

Wine Glass Pumpkin Candle Holders

Hi Everyone! So sorry I haven't written in a while! I've been feeling a little bit under the weather lately. But I'm back and ready to show you the results of a couple of my latest Pinterest projects. Since the leaves are changing and Fall is upon us I thought we'd stick with a little theme for the next several posts. PUMPKINS!!  So without further ado, let's do this dang thang!!


pinterest version

 First up, Dollar Tree wine glasses painted to look like pumpkins and turned into candle holders.. Phew that was a freaking mouth full. You've seen these I'm sure. If you haven't seen the pumpkin ones you've seen the snowmen ones. They're all over Pinterest.


pinterest version

Lucky for me, I had 4 extra wine glasses left over from the project where I tried to frost them myself so I didn't have to go buy any! Score one for Rayna! I also had all the paint I would need to make them look like pumpkins. Or to TRY and make them look like pumpkins I should say.  I mean really. Look at the way these are painted. Does the person who originally  painted these snowmen or these pumpkins really expect the average Pinner to be able to paint like this?? I actually consider myself
to be a pretty dang good painter but, as you'll see, my pumpkins turn out
nothing like the one you see to the right.


OK, so this is really a simple project if you don't care that yours look NOTHING like the one's you see on Pinterst hahaha. If you do, Stop reading now and good freaking luck. OK, I took three wine glasses, two for red wine because they're rounder like an actual pumpkin and one glass for white wine. All I did was  paint the bottom half orange and then  paint the stem green as so. I let it dry and then did another coat of each. For some reason the paint doesn't go on evenly on the glass so it actually looks like it has some shading and depth to it when it dries. Pretty cool cause you don't have to go in with lighter and darker colors to create that effect (affect ?? )


Next, I just waited for the second coat to dry and then took a beige paint I already had in my art box and painted stripes vertically down the base with a very thin paint brush. I know, I know, it looks pretty crappy here when it's wet but I promise it does actually look like a pumpkin when it's all said and done with. 
Lastly,  it was time to try and decorate the stem like the pic of the original.  I, however, refuse to spend any money on this project  because 1.) I thought it was going to be a bust when I compared my pumpkin wine glass to the Pinterest one and 2.) Have you been to Michael's lately? A little strand of those leaves costs like $5 bucks!! Forget that. I had some of this stuff that's like what a basket is made of (no freaking idea what the hell this stuff is) leftover from - again- another project. So I thought that might work (remember I was HATING my pumpkin painting skills at this time). I also, for some random reason, had picked up some tea lights while I was at the Dollar Tree one day so I didn't have to go out and buy those either.. Double Score for Rayna!
 
I took three strands of the twine, bunched it together and then tied it in a bow around the stem of the wine glass. I then turned the wine glasses upside down and put a tea light on the base of the wine glass. I lit them Annnnnnnnnnnnnnd Here's the big reveal!!
TA-DA!!

 Not to bad right? I mean for something that took me maybe 10 minutes to complete they look pretty damn good. My real estate agent actually saw these on my book shelf and fell in love with them. She wanted to know where I bought them LOL! So, if you've pinned this and are thinking I can't paint like that.. Well, now you don't have that excuse because I can't paint like that either and mine came out OK.
If you didn't have any of these items at your house and wanted to make these here's what it'd cost you. (you can get most of it at Dollar Tree)
Dollar Tree wine glasses about $3.25 for all three
Dollar Tree Twine or ribbon for the stem $1.09
Paint $1.25 for two at Walmart or Michaels... so a little over $5 bucks total!

Here's a little sneak peak at our next pumpkin project! And if you're my friend on Facebook you may have heard that I attempted to make the Pinterest Pumpkin Spice Latte that claims to be an exact replica of the Starbucks Fave. That one's coming up in a few days! I promise you don't want to miss that one.
 Plus, I have some more recipes to share with you guys!

Have a great night everyone!
XOXOXOXOXO

The Posh Pinner