Wednesday, August 29, 2012

DIY Wall Art for Child's Room or Nursery

Happy Wednesday everybody!! Time for another Posh Pinner Pinterest Project! This week we're trying out Spearmint Baby's DIY Wall Art. I picked this one because 1.) I loved it when I first saw it and 2.) It seems like all my friends and family are pregnant right now and instead of buying a bunch of baby clothes they'll probably never wear, I thought a personalized piece of art would be more sentimental.


Her version

This is the piece that first caught my eye on Pinterest. It looked so simple that I didn't even have to read Spearmint Baby's tutorial to make mine.
 
 Items needed: 1 canvas, a decorative piece of scrapbook paper, 2 to 3 paint colors, a wooden initial, and a paint pen (optional), craft glue or Mod Podge, painters tape or masking tape.
First off,  you want to pick a canvas size that works for the room you'll be hanging your art in. I make so many paintings I buy mine in bulk. You can get a 5 pack in several different sizes at Michaels for $19.99 and if they're having a sale, for $14.99. Check for coupons too at www.Michaels.com.  Next, you want to select a piece of scrapbook paper that matches your room. There's a thin kind and a thick kind. I suggest going with the thick. And finally, head to the wood section of your local craft store and pick your favorite initial. Michaels has them in big, little, white, black, unpainted, cursive, you name it they have it. I went with the unpainted letters because they're cheaper. I already had the paint, the tape, and the Tacky Glue at home (I prefer this kind over Mod Podge for this project.)

Now that you got your supplies, you're ready to start.  First, you want to tape off your canvas with your painter's or masking tape. I went down about 3/4 of the way. The painter's tape is exactly the right size you'll want for your stripe. Now you can either paint the entire canvas like I did in my Leighton painting leaving the stripe white, or you can leave the upper  half of it white, paint the other half and then once it dries, retape and paint your stripe. It's completely up to you. 


Next, take your scrapbook paper and trace a circle on it using something in your house. I used a Tupperware lid, but a bowl would work. Once you got your circle, cut it out. Now it's time to glue it to your canvas. *Tip- use a paint brush to spread it on super thin. Make sure you get the glue all along the edges of the circle so they don't peel up.


Once you got your circle glued down it's time to paint. (first paint your initial if need be that way it has time to dry). Paint the bottom half of the canvas the color of your choice and let it dry. You may need to apply several coats. While it dries, cover the back of your initial with your Tacky glue and paste it to the center of your circle. Next, tape off your canvas again and paint your stripe.

 By this time your bottom half should be dry and you're ready to finish it off by adding the name to personalize the painting. I drew it out with a pencil and then went over it with a paint pen. The artist from Spearmint Baby printed a name out online in the type of font she liked best, then traced that on to her canvas and painted it.  


 This is the final product! Took me about 20 minutes total to
finish this bad boy and I love how they turn out. They're so easy and the perfect gift for a new baby or a birthday! You could even make an adult version for a housewarming party by changing a few colors out, adding a damask print paper, and painting the last name.

*Note*-The blogger from Spearmint Baby suggested adding ribbon in place of the stripe. She also painted little dots around her circle when she was finished.


 Here's a couple more I made for my nieces Leighton and
Hadley! They were a big hit!
Final verdict: canvas = about $3.50
paint = $0.53 a bottle x's 2
wooden letter = $1.99
glue = $2.73 a bottle
paint pen = about $2.00
scrapbook paper = $0.59 a sheet
painter's tape = $2.85
Even if you had to go out and buy everything, this project would cost you $15 bucks total and you would have plenty of leftover materials to make a couple more. It took less than 30 minutes to make. I'd say this is one of the best Pinterest Projects I've attempted so far, and believe me I've tried lots :) I've got absolutely nothing bad to say about this one. Shocker right!?

Next week we're making frosted wine glasses and I can promise you I'll have plenty to say about that one (insert evil laugh here.) Until then,

XOXOXOXO

The Posh Pinner


Wednesday, August 22, 2012

Scrapbook Paper + Glass Plates

Good afternoon to all my Pinterest Peeps! Time for the breakdown and-dum, dum, dum- the verdict on my latest Pinterest project. This week I tried the Scrapbook paper + Mod Podge + Glass Plates ='s Oh so Pretty!


 I have to give serious props to prettyhandygirl.com. This chick is super craftastic to come up with this, and  waaaay more talented than I am. Therefore her plates came out way better than mine. But I think with a few small changes on my end I could get mine looking like hers.

Items needed: Glass plates, Mod Podge, Scrapbook paper, scissors, a pencil, glass cleaner and a couple of canned goods from your pantry.

Ok, so when I was scouring the Dollar Tree looking for those dang trays from my first blog post I saw glass plates on one of the aisles. I picked up two just in case I blew it on the first one. Spent like $2.20 on them and these are nice glass plates.

Next, I headed over to Michaels for some scrapbook paper. The tutorial says the thinner the paper the better so that's what I went with. I think picking out the paper I wanted was the most time consuming of this whole project.  I already had the Mod Podge so I headed home to get started.
thin paper works best

trace the plate onto your paper
First I wiped off all the fingerprints with some bobo Windex. The next step according to the tutorial is to lay the plates down on the paper and trace around the edge to get a circle the same size as the plate. Then cut out the circles.


slits in the circle

Once you've got your circles, you cut 4 slits evenly around it. BUT NOT ALL THE WAY TO THE CENTER! Next, cut four more slits between the ones you've already made until it looks like this.  You should end up with 8 if you do it right. Confused yet?

Now you're ready to glue the papers onto the plates. But THIS is where it got a bit tricky in my book...You cover the bottom of the plate with your Mod Podge(Make sure its a thin coat!) Then you're supposed to lay the paper onto the center of the plate. 


Next, you gently press the paper around the edges, but you have to make sure it slightly overlaps at each slit. (Otherwise you get this gap where there's no scrapbook paper and it looks like crap.)  That sounded easy enough. But once I pressed the paper down it was painfully obvious it wasn't frickity frickin centered! I tried again with the other plate and the same thing happened again which means I'm an idiot or this is hard to do. 
 I was hoping it would look o.k. once I was done so I just proceeded to the last step which was to apply a VERY thin coat of the Mod Podge on to the back of scrapbook paper that's already on the plate. I smoothed out the wrinkles with my finger just like Pretty Handy Girl said and then placed the plates ontop of the canned goods to dry.
Once the plates dried they looked like this:


Here's the verdict: These aren't bad and I'm sure if I stuck a bunch of cookies or something on them no one would notice BUT they definitely don't look like the one's on Pinterest. You can definitely tell the paper is completely uncentered and you can see the Mod Podge through the glass.

What I'd do differently: To solve the whole uncentered paper, especially for us new to this crafting craze, I wouldn't cut the paper to fit the exact size of the plate. I would make sure the paper was a good 2 or 3 centimeters longer than the edge of the plate. That way it wouldn't have to be exactly centered to turn out OK.. Once I laid the paper onto the plate and pressed it down I would just trim the excess off.. BAM!
To fix the visible Mod Podge, I'd just dilute the stuff with water to make it a lot thinner. Or buy the aerosol Modpodge. Those two simple fixes and this would be a pretty darn simple and cheap decorative plates for parties, baby showers, wine tastings, whatever.

Here's what I spent:
Two really nice glass plates from the Dollar Tree = $2.25
Scrapbook Paper from Michaels = $0.59 a sheet so about $1.25 total
Mod Podge = $5.67 (you'll use this shiz over and over again if you're a Pinterest freak like me.. It's like the crafter's crack and most of you have this anyway. Or you can make your own by watering down some elmers)

The whole project took me less than 20 minutes and cost about $3:75 not including the Mod Podge. Not bad, and if you take my suggestions it should work out for you.

The only Negative I can say is that these plates can never be washed obviously. You can either use them once and be done with them or you could always wipe them off really well with some Lysol and wet paper towels. 

Next week we're making a super cute, super simple piece of personalized art for your child's room!! This one you'll love, love, love!! 

xoxoxo
The Posh Pinner 


Friday, August 17, 2012

Dollar Tree Trays and Chalk Board Paint

I know you've all seen this project on Pinterest.

Buy serving trays from the Dollar Tree, paint them with chalkboard paint and then VOILA! Put these out at your next wine tasting and write what type of cheese you're pairing, or hang them and use them for your shopping list. I've seen lots of my friends repin this project so I picked it as my first. I must add that when I clicked on the pin to go to the instructions link it didn't work. I'm not sure if it's just my pin but I couldn't locate it anywhere else. Therefore I was just going by the pic and the pin detail to try this one out.

Ok, so first off I went to Dollar Tree and they were completely sold out of the trays. I guess a lot of my fellow pinners in Seattle are trying this one out as well. After three trips to three separate Dollar Trees I finally found them and I have to admit, I was pretty darn shocked at how small the trays at the Dollar Trees in Washington are!
To the left is the size of the tray in comparison to my hand. (They might be bigger at the Dollar Tree near you.) I bought two different trays ,this one and a round one, and spent about $2.25 on them. Next I went to Wal-Mart to for the chalkboard paint. I found it in the craft section and bought the Folk Art brand for $3.67.


Next, it was time for the first coat, which I must say left me pretty un-optimistic about how this was going to turn out. There was just nothing for the paint to cling to and I started wondering if maybe I was supposed to sand the tray down before painting.

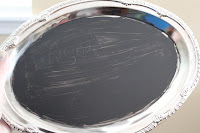
After four coats, the tray still wasn't looking like the picture from Pinterest. I don't know if you can tell from the pics, but it was very streaky and didn't hold the chalk well.  I decided I'd head back to Wal-mart to get the heavy duty chalkboard paint from the home improvement section of the store. the same kind from the picture on Pinterest. It cost me $9.67 for the Rust-oleum brand. At this point I was getting really PO-ed at this supposed simple and cheap project. But, between searching all over the city for the trays, to the time spent waiting for each coat to dry, to driving 20 minutes back to Wal-mart, I'd invested WAAAAAAY to much time into this and refused to give up!

I popped open the paint can, stirred it up and applied another coat to the previous four from the day before. I decided to take the other tray and try out the Rust-oleum brand on it and this is what I got.  UGH!

this is before it dried

this is the dried
 So, to sum it all up...
Driving  to three different Dollar Tree's to get trays that may,and that's a big may, hold  a block of cheese ='s 3hours and $2.25
A trip to Wal-Mart for paint ='s 45 minutes and about $4.00
Applying 4 coats of paint and waiting for it to dry over and over again ='s 5 hours
Another trip back to Wal-Mart for a different paint ='s about $10.00 and an hour because of traffic!
Then another 2 hours applying and waiting for the finished product
That's $16.25 not including all the Gas money looking for the darn things and like 12 hours out of my life and this is what I got!!

This teeny-tiny tray that is full of bubbles and is un-usable. I didn't even bother finishing the second tray.
Now I fully admit that there may have been other steps I missed because the link to the actual project was broken. But just simply painting a tray with chalkboard paint??? NOPE.. Don't even bother. I could have bought the cheap, faux glass serving tray that was 3 times bigger for a buck and been done with it.. But then I wouldn't have anything to blog about now would I?? haha..

Stay tuned for next week's Pinterest project where I take Glass plates from the Dollar Tree and make them pop with scrapbook paper!