Sunday, September 23, 2012

Pinterest Recipes Part Deaux

Hey everybody! As promised here's 5 more Pinterest recipes I've given a shot over the past two weeks. Some good, some OK and some that should never, ever, ever have made it on to Pinterest in the first place!

I'm kicking it off with my fave recipe I've found on Pinterest so far!
1.) Crock pot chicken soft tacos from From pin4fun5837.blogspot.com   
 I love, love, love these! In fact I have some cooking in my crock pot for dinner right now.
Ingredients
1 pack of taco seasoning (whichever you like best, mild, hot, whatever)
1-3 chicken breasts (I put mine in frozen)
jar of salsa
tortillas
your favorite taco toppings
Place your chicken breasts in the crock pot. Next, dump the pack of taco seasoning and the jar of salsa on top of the chicken. Let cook on high(4-6 hrs.) or low(6-8 hrs.) Should be able to shred with a fork. Place meat mixture in tortillas and top with your favorite toppings! Little tip, these are awesome if you put some Mexican rice in your tortilla.

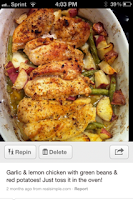
2) Garlic lemon chicken from realsimple.com- This one is OK. Has a nice, clean taste. Is very Mediterranean to me. Definitely not as simple as tossing in a crock pot and forgetting about it, but pretty simple. Needs some tweaking though.
Ingredients6  tablespoons  olive oil
2 lemons, 1 thinly sliced, 1 juiced
4 cloves garlic, minced
1  teaspoon  kosher salt
1/2  teaspoon  freshly ground black pepper
3/4  pound  trimmed green beans
8 small red potatoes, quartered
4 chicken breasts (bones left in, with skin, about 3 1/4 pounds)
Directions
1.Preheat oven to 450°F. Coat a large baking dish or cast-iron skillet with 1 tablespoon of the olive oil. Arrange the lemon slices in a single layer in the bottom of the dish or skillet. (this is waaaaaay lemony if you use this many lemon slices. If I make this again I'll try only half the amount.)
2.In a large bowl, combine the remaining oil, lemon juice, garlic, salt, and pepper; add the green beans and toss to coat. Using a slotted spoon or tongs, remove the green beans and arrange them on top of the lemon slices. Add the potatoes to the same olive-oil mixture and toss to coat. Using a slotted spoon or tongs, arrange the potatoes along the inside edge of the dish or skillet on top of the green beans. Place the chicken in the same bowl with the olive-oil mixture and coat thoroughly. Place the chicken, skin-side up, in the dish or skillet. Pour any of the remaining olive-oil mixture over the
chicken.
3.Roast for 50 minutes. Remove the chicken from the dish or skillet. Place the beans and potatoes back in oven for 10 minutes more or until the potatoes are tender. Place a chicken breast on each of 4 serving plates; divide the green beans and potatoes equally. | Hands-On Time: 15m| Total Time: 1hr 15m-this took a bit longer to cook than the recipe calls for in my oven. Just keep an eye on it.

Up next dessert time!!
3.) Nellie & Joe's Famous Key Lime Pie from  chefscatalog.com- I totally see why this is Famous!
 Love it!!! Pretty easy too.
Ingredients1  9-inch graham cracker pie shell 
1  14-ounce can sweetened condensed milk 
3  egg yolks 
1/2 cup  Nellie & Joe's Key West Lime Juice (I didn't order this, I went to Walmart and squeezed the juice out of about 30 of these limes lol. I like the real stuff better, but you can just find a bottle of key lime juice and use that.)
Fresh whipped cream and lime slices for garnish 
Directions
Preheat oven to 350 F. Combine milk, egg yolks and lime juice. Blend until smooth. Pour filling into pie shell. Bake for 15 minutes. Allow to stand for 10 minutes before refrigerating. Just before serving, top with fresh whipped cream and garnish with lime slices. Simply Fabulous! Glad I tried this one out.

4.) Who needs a cocktail?? This is Vodka strawberry lemonade and it's exactly that. Vodka and strawberry lemonade. I came up with my own version for a party we had recently and it was a hit.
Ingredients
1 bottle of stoli strawberry vodka
1 container of frozen minutemade limemaid
grenadine to add color
lime wedge for garnish.

I poured about half a bottle into a punchbowl and added the limeaid and water. Poured it into mojito glasses with some crushed ice, added a splash of grenadine and topped with a lime wedge. It was pretty yummy and you couldn't taste the vodka at all. Which may be a bad thing for some people, but not my friends.. :)

Lastly, I must shatter some hopes and dreams real quick. I know you all have pinned the cheesy garlic biscuit recipe that claims to be the same as Red lobsters. Let me tell you, FORGET IT! Erase it now! We should all find the person who came up with this recipe, tie her up, and force her to eat our nasty imitation biscuits over and over again. That's how UNLIKE Red Lobster these biscuits are. I should have listened to my girlfriend when she told me these sucked but I had to try it out myself for my blog. They're terrible. Don't waste your time.


Join me this week for my follow up to easy fall decor.  This time I'm attempting to turn wine glasses into pumpkin candle holders!

xoxoxox
The Posh Pinner

Wednesday, September 19, 2012

Easy Fall Decor-Part 1

Happy Wednesday to my faithful followers! I just wanted to say how much it means to me that you all join me every week for my crazy Pinterest rants and raves. I'm going to be posting more frequently over the next few weeks because I'm busy decorating for Fall and Especially Halloween! I've got a pantry full of Halloween decorations that I can't wait to share with you all, but I'll wait till it's at least October before I go there.

I thought I'd do something a little different for this entry. Usually I try out a specific project, and believe me I've got two pretty good ones for you I'll post later this week, but today I'll show you a couple of decorations I've put up around my house.  They're Pinterest inspired, just not an exact replica. They're simple, their easy to make and better yet, they're CHEAP! In case you haven't figured it out yet, I'm pretty thrifty. I don't like spending a lot of cash to make my house look good. Everything I do is very budget friendly. It may not be as pretty as some of the stuff on Pinterest but I like it ;)

My next door neighbor, Linda, invited me in to her house a couple of weeks ago to show me her cottage chic decor. Beautiful by the way, but she had all these gorgeous  Hydrangea flower arraignments in every room. I thought they were fake but it turns out she cut them from her bushes and let them dry out! Gorgeous. She has blue in her yard, but we have this deep purple color that I thought would look amazing for Fall AND I was so RIGHT! So check it out, I cut a bunch from my yard and then stuck them in Dollar Tree vases and vases I had lying around the house. The Dollar Tree has these super cute scarecrows on a stick so I stuck one in the flowers and Ta-Da! A simple centerpiece that cost me a buck! I still want to get a cute table cloth for this table but right now I've just got a wicker runner on it with some fake leaves I got a Michaels for a buck a pack. Nothing special but still cute.

Here's another pic of the dried Hydrangeas up on my mantle. They look pretty creepy up there with my Halloween decorations which you'll see in a few weeks. I've also got them in my master bath. I bought some fake ones for my living room at Michaels for $7.99 a stem And they look nothing like this. If you have hydrangeas go outside and cut some that are close to dying and get them in a vase! They're gorgeous. Special Thanks to Linda for teaching me this trick!

Next up, I love wreaths! Especially since Pinterest popped up. Seems like there's a wreath for every holiday. What I don't like is how much wreaths are! Could you imagine making a wreath for every single holiday and season. My solution.. I bought one wreath, and I change out the decorations I attach for every season. For this one I bought some leaves attached to a stick and just stuck them in the wreath, same with the little scarecrow. The L is attached with some double sided tape. I got this wreath on sale two years ago for about 8 bucks on clearance at Wal-Mart. For Christmas I just attach some ribbon and ornaments in the same way. Fourth of July-ribbon, a flag, the L.. good to go. So easy. I spent $0.97 a piece for the leaves and 1 buck on the scarecrow. The L was $1.99 at Michaels.


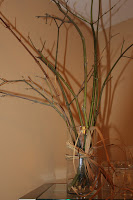
And Finally for this edition of the Posh Pinner, I'm sure you've seen the pin to the right going around for Fall. I love these but have you seen how expensive these stupid fake limbs are at the craft store!? I went looking for them and thought seriously? It'll cost me $30 bucks to make this and it looks like it came out of my yard. And that got me thinking.. It looks like it came out of my yard!!! So, I went outside with my rose shears and cut some limbs off different trees in my backyard. I laid them out in the sun for a few days so they'd dry out. I trimmed all the leaves off and what I had was pretty close in my opinion. I didn't want to go buy another vase so I took one I got at the Dollar Tree and stuck the limbs in it. (see the pin on the left)

I got this pack of this fake basket stuff ( i have no idea what it's called) in the garden section of the Dollar Tree (yes they have one lol) and tied it around the vase. Looks really rustic and I love it. Next, of course I stocked up on those little scarecrow things, they were so cheap and I use them in everything,  so I had an extra one lying around. AND this is my cheap version of the above.  I know it's not as good and I skipped the pumpkins, but it cost me about a $1.50 and I think it looks pretty good with the rest of my decorations I have up.


Be on the lookout for my next  post this week. I'll be giving you the verdict  on some more Pinterest recipes. And for my next project, I'm combining two more Fall decor projects, a simple Happy Fall painting I'm sure you've seen and also the project where you paint a wine glass and turn it into a candle holder! We'll see if it actually looks like a pumpkin when I'm done.

If there's any projects you'd like me to try out for you, just shoot me an email.. Poshpinner@gmail.com
I'll be glad to add it to my list!

xoxoxoxo
The Posh Pinner signing off!

Sunday, September 16, 2012

Pinterest Recipes- The Good, The Bad and the Eh..

Hi everybody! Hope you've all had a fabulous weekend.  I promised in my last blog post that I'd give you guys the rundown on some Pinterest recipes I've tried out, but first I have a confession. I cant cook. Not even a little bit. If it weren't for my crock pot, boxed macaroni and cheese and bagged salad, my husband Matt would starve to death. In all actuality he's the chef in the family, and by chef I mean he can pour BBQ sauce on some chicken breasts, throw them on the grill and open up that bagged salad. Neither one of us has ever been that good in the kitchen, but Pinterest is slowly teaching me the ropes. Therefore, you're not going to see me trying out the pumpkin puree souffle, or the braised leg of lamb with some sort of demi-glace, whatever the hell that is. Instead, you're gonna get a lot of crock pot recipes and casseroles that take me about 5 minutes to prep and that I have a 0% chance of screwing up. You feel me??

NOTE* I must warn you guys. I eat a lot of chicken and I mean A LOT!!! Not to get too personal on ya, but I have a medical condition that limits the types of foods I can eat, but I'll try to keep things interesting for you.

THE GOOD

1.) Easy Crock Pot Chicken & Rice from forkinit.blogspot.com
I wanted to start you guys out with a pretty good one. Matt loves this! He loves it so much that he's eaten it the past three days (which  is fine by me cause it means I didn't have to cook) It's the easiest thing in the world. Just throw it all together in the crock pot and then cook some rice right before you're ready to serve it. Done.
Ingredients:
2-4 frozen boneless skinless chicken breasts
1 pkg. (8 oz.) cream cheese (let sit out to soften) ( I use non-fat)
1 can cream of chicken soup
1 pkg. Italian dressing seasoning (the dried kind in the packet)
rice

Stir the cream cheese (let it get soft so you can stir it), cream of chicken, and seasoning together in the crock pot.  Put the chicken in (frozen is OK but I thaw mine first)  and cover with the mix. Cook on high 4-6 hours or until the chicken is cooked and fall-apart-tender.

Cook the rice in a pot and then smother with the chicken mixture! That's it. One thing, the chicken mix ends up getting pretty thick so you may want to add a little bit of water towards the end.

2.) Baked Italian Chicken-from Savings-Makes-Cents
- this one is just as simple.. It's not AMAZING but it's perfectly acceptable for a Tuesday night dinner and it's super quick. *Note*Instead of a full stick of better I use 2 1/2 tbsp's and then some olive or vegetable oil so it's a bit healthier.
Ingredients
6 raw chicken breasts
new potatoes
green beans (really any green veggie would work.. I used Zucchini)

Arrange in 9×13 dish. Sprinkle with a packet of Italian dressing mix and then top with a melted stick of butter. Cover with foil and bake at 350 degrees for 1 hour. (took more like 1.5 hours.. just up the temp)


3.)Grilled Jalapeno Pepper Poppers from Food.com-
Looking for something easy and delish to make for next week's football game! These are the BOMB!! Love them! (you end up with 24 of these)
Ingredients
12 fresh jalapenos
1 (8 ounce) package neufchatel cheese or 1 (8 ounce) package cream cheese (I prefer cheddar, but they all are good)
12 slices bacon

Cut peppers in half and use a spoon to remove the seeds and white membranes. Next, Fill each half with  cheese. Cut the bacon slices in half so that you have 24 shorter slices. Wrap each cheese stuffed jalapeno with a bacon slice and then secure with toothpicks if you need to or slide them on skewers. Grill them until the bacon is crispy and browned, turning every few minutes (stay with them and watch for flare ups from the dripping bacon fat or they will burn); grill for about 15 or 20 minutes. (you could even bake them if you remember to flip them)
The bacon should be crisp, the jalapeno crisp tender and the cheese should be hot.

NOW THE BAD

1) Chicken Eenchilada in Avocado Cream Sauce-- I know you've seen these. In fact I think the pin says something about them being the best enchiladas in the world. SO NOT TRUE. I'll admit the cream sauce is a bit tasty, But added with the other stuff, nope. It's too much. Matt hated them and he eats anything I cook as to not make me feel bad because I try so hard, and he couldn't even stomach one of them. Not to mention... HOLY list of ingredients! It took more than an  hour just to prep these to put in the oven, and Matt and I were both working on them! Save yourself the trouble and if you're craving Mexican wait until the chicken soft taco recipe I'm giving you later this week.  (I'm only listing the ingredient list so you can distinguish this enchilada recipe with the others making their way around Pinterest.)
Enchilada Ingredients:
2 Tbsp. olive oil
1 medium white or yellow onion, peeled and thinly sliced
2 poblano peppers, stemmed and thinly sliced
1 jalapeno pepper, finely diced
8-10 flour tortillas
4 cups shredded cooked chicken(rotisserie works best)
2-3 cups Monterrey Jack cheese
optional garnish: fresh cilantro, sour cream, and/or shredded cheese
Avocado Cream Sauce Ingredients:
2 Tbsp. butter
2 Tbsp. flour
2 cups chicken broth
3/4 cup sour cream
1/2 tsp. cumin
1/2 tsp. salt
1/2 tsp. garlic powder
1/4 tsp. pepper
2 California avocados, peeled and pitted
1/2 cup chopped fresh cilantro
juice of one lime
2) OMG Chicken-- You'll say Oh My God all right. As in Oh My God what the eff bomb is this crap!!??!! Just pretend you NEVER, NEVER, NEVER EVER saw this. Oh my vomit this is bad!!! Simple, but bad!!!! I think I threw this away and ate cereal the night I made this.


Later this week I'll pass on the best chicken soft taco recipe in the world! It's so good. I also found a pretty simple Key Lime Pie recipe that was totally worth the time and effort.


XOXOXOXO
The Posh Pinner

Thursday, September 13, 2012

Homemade Child's Chalkboard Table

Hey everybody! Hope you're all having a wonderful Thursday.  Today I'm showing you how to make a chalkboard table like you've seen all over Pinterest. My friend Bekah made one for her son so  I decided to try it out for my niece Leighton's 2nd Birthday. Lil L--my nickname for Leighton-- loves to draw and I thought I could make a cuter, sturdier one than the Disney Princess one her parents got her.
*WARNING* This project was not as easy as I had originally hoped (Pain in my A$$ actually!!) and I ran into a few problems along the way. That's why I selected this project for my blog. I'll tell you what I did wrong so you don't make the same mistakes.

Ok, so I didn't have an old table just laying around so I picked up one of those click clack tables from a big box store that shall remain nameless because of what I will say later in my blog. It's the perfect size for Lil L. I sat on the paint aisle for 30 minutes trying to freaking decide if I was gonna go with acrylic paint or spray paint. (I never use paint for the house because I need so little of it and it's too expensive for one Pinterest project.)  I wasn't so sure the spray paint would work on the table since it's not real wood so I asked the chicky at the paint counter what she thought. FIRST MISTAKE.


This self professed "paint expert" just went on and on about how well spray paint covers those click clack tables. "Oh yes! I spray paint over those all the time. Of course it works. I paint everything, That's why I work in the paint section. You'll be fine! It'll work great. So much easier than painting by hand. Blah, Blah Blah."   I picked out the good stuff, the Krylon, a thing of chalk and checked out. I already had the chalkboard paint (2 kinds) from the Dollar Tree Tray fiasco, painter's tape and brushes so I was good to go.  

 First I spray painted the legs of the table and let it dry. SECOND MISTAKE. The self professed "paint expert" from above was a LIAR!! That shiz did not cover and instead the chemicals in the dang paint melted the fake wood covering of my click clack table. UGH! I'm serious ya'll, I have a bad temper--like throw stuff, curse, slam things, stomp my feet, go off on a tangent bad temper-- and as usual I was PO'ed. I seriously wanted to drive to the big box store that shall remain nameless and PUNCH self professed "paint expert" in her ovaries! I couldn't take the table back and get another one just because the paint expert was a moron. I had no choice but to peel all that wood covering off the table. This was not as easy task. I had to use a knife, pliers, my hands and even my teeth to pull all that stuff off. I even got a nasty blister on my finger than got infected from the spray paint!! Seriously, PUNCH HER IN HER OVARIES!!!  It took me about 2 hours to peel it all off. What's under the click clack table fake wood covering is this ply wood that looks like it has hair on it. I probably should have sanded it down but I honestly thought this project was DOA so I didn't.

Next I tried to spray paint the hairy wood. THIRD MISTAKE. That didn't work either!!!  It soaked into the wood and looked like I spilled Kool-Aid all over the it. A Freaking mess. Very Unhappy Rayna! I refused to give up and let the "paint expert" win! Luckily I had some acrylic paint in pink leftover so I tried to paint over the hairy, Kool-Aid stained wood with that. It actually turned out pretty good and I was shocked and pretty stoked because I defeated the "paint expert" all on my own!!! Take that Beeeeyaaatch!!!


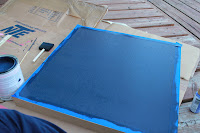
I then taped off the top of the table to create a border and then painted the top with about 3 coats of the chalkboard paint. I went with the Rust-Oleum brand since I have a HUGE can of it left (again from the Dollar Tree Tray fiasco.)
  

 Once the chalkboard paint dried I painted the border a turquoise color that matches Lil L's room. Super cute colors fo' sho! I have no idea why the spray paint sucked so bad on this type of wood and the acrylic worked so well. Beats the hell out of me but I'm glad it did and glad I had extra paint on hand. I hate to lose if you can't tell. I'm like Monica from Friends.


 Once it dried, AGAIN, I put the table together. Thought it looked pretty good.... only one problem. The hairy wood. LOL! Geeze Louise, kill me now already... This damn table was driving me nuts!! I tried to write on it with chalk and it worked but it was hard to write over the hairy wood. Luckily my husband convinced me to try sanding it. I was afraid it would take the paint off and all my hard work would have been for nothing but it didn't! It worked out perfectly!! Whoot whoot! Score one for Matt!!

Lastly, I thought the table needed something else. I grabbed a black paint pen and made different sized polka dots all over it.. Here's the final product! TA-DA!! Cute for a toddler's room right?


Final Verdict:  All I had to buy was the table at $12.99 and a can of spray paint $3.99 so it cost me about 17 bucks.  Since the spray paint doesn't work it should have been the 13 for the table and that's it since I had everything else. Not too bad.

  But if you had nothing you'd have to buy the chalkboard paint (which you will use again) at $3.99 to $9.99, painter's tape at $2.99,a thing of chalk at $0.50 and then $0.50 per bottle of acrylic paint (I only used 1.5 bottles.)  Total it would cost you between $20 and $30 bucks. Still not too bad in my opinion since the cheap Disney ones are like 20 bucks and they tear up so easily and aren't as cute. All in all this project took me about 2 days because I had to stop and start all over twice. Once I started using acrylic paint, it took about 2 hours.

Now here's my suggestion on how to get this done right the first time. For God's sake just use an old table you already have or hit up a thrift store or Goodwill for a super cheap one. Real wood works so much better and is easier to paint. If you just have to use a table like I did, sand it down before hand and then paint it with acrylic. Not spray paint!! And get it at Ikea or Target. It's a couple of dollars cheaper. Also, Target and Ikea have these click clack tables in colors like white, red, yellow, turquoise, purple, pink, you name it. You can totally bypass painting the whole table and just sand the top of one of those and use some chalkboard paint. BAM! You're done. Would save so much time!

You can also make adult versions of these using an old kitchen table. You then bring it out for parties and lay food or wine on it and write what you're serving in chalk. If you usually play hostess it's a great idea. I am so making one as soon as I find me a table.

Finally NEVER EVER EVER  trust the over-confident paint expert at the Big Box store that shall remain nameless. Just trust me on that one....

Oh, one more thing.. Make sure the person you're making the table for lives with you or somewhere you can just deliver it to. I tried to mail mine to Lil L and it was going to cost me upwards of $50 dollars. What the What! Hell to the no!  Now I have a child's chalkboard table in hot pink and polka dots sitting in my extra bedroom and have to buy Lil L something else for her Birthday!!!  Isn't it ironic? Don't you think? ;)

As for next week's project I'm not too sure yet. I've got some other projects I've already completed but it's almost Fall and Halloween is coming up, and then Thanksgiving and then Christmas!! I'm thinking it's time to start trying out some of the Holiday pins. I've also started trying out some recipes on Pinterest and some aren't that bad.. Ok, more bad than good, but you guys need to know those too right? I'll start posting those in between projects a couple at a time.

Thanks for reading everybody! Keep an eye open for those recipes.

XOXOXOXO
The Posh Pinner

Tuesday, September 4, 2012

DIY Frosted Wine Glasses

Happy Wednesday to all my readers out there. Time to get our blog on!  The project I picked to try out this week is the "DIY frosted wine glasses."  If you're like me or my girlfriends you can never have enough wine glasses and come on, these look easy enough right??

Let me just start off by saying this IS NOT going to be a happy, feel good blog post! This project Pissed me off. I know that's easy to do, but I am not a fan of wasting my time and especially my money!! Nor am I fan of clicking on a Pinterest Pin and the link being broken. This project is completely self explanatory, but I still like to know where the idea is coming from and I certainly don't like having to waste even more time looking for the source. I gave up after 10 minutes because I'd already wasted too much of my day making these crappy wine glasses.

So, here's what you supposedly need: Wine glasses from the Dollar Tree, (which I heart by the way. These wine glasses are freaking huge and perfect for my habit) rubberbands and frosted glass spray paint.

I hit up my local Dollar Tree, which knows me as the Posh Pinner now because I spend so much time there, for my wine glasses and then headed over to Michaels for the paint. They only had the silver in, which I assume means a bunch of Pinterest freaks like myself scooped up all the white to try out this project. If that's the case there are A LOT of PISSED off PINNERS out there!! And this stuff was not cheap.

 I looked at the pics from the Pinterest pin and wrapped my wine glass with the rubber bands. Next, I went outside and sprayed a light coat of paint on the glass. I turned the glass over when I was done to let it dry for a couple of hours.

There's another pin going around on Pinterest doing basically the same project except using round stickers instead of the rubber bands. I thought "oh what the hell" and decided to give it a try since I already had the paint out. I placed the stickers on the glass and then sprayed it with the paint and let it dry as well.


Here's where I started to get mad. As I watched the glasses dry, I noticed the color from the stickers started to bleed from the paint. I was perturbed but blamed myself for not thinking about that. (even though no where on these pins does it say not to use colored stickers and that's all I could find.) I was still hoping they'd come out OK. I gave the glasses another couple of hours to dry and then decided to pull the stickers and rubberbands off to see how they turned out.

Here's where I got pissed! The dang paint gunked up around and under the stickers and the rubberbands. This created this sticky icky glob! It was so gloopy and looked so bad the glasses were ruined! Just a Hot Mess!! I just used a light coat of the paint too! What the heck..   Not to mention this paint has the worst smell. I've left these glasses outside for 2 weeks trying to get rid of it but they still stink.


Do you see this!!! How crappy does this look?? I seriously doubt I did anything wrong during this project. Glass, rubberband and paint! Same thing happened with the sticker glasses.

Wine glasses: (i bought 6 so I'd have a set) about $7.00, Rubberbands $1.12, Stickers $1.24, Frosted glass spray paint about  $10.00 So about $20 bucks.. That's a freaking manicure, or 2 comfy Target T's, or 4 Pumpkin Spice Lattes!! Not to mention all the time it took driving to Wal-mart, the Dollar Tree, Michaels and then the actual time I put into making these stupid things that are now in a landfill somewhere.. (yeah, yeah, yeah. Landfill... I said it)

Verdict: NOT HAPPY!!! Waste of my time and money!! Stay far away from this project!!!!!

Next week join me for the trials and tribulations I went through trying to make my niece Leighton a homemade chalkboard table for her 2nd Birthday!